June 17, 2016

Shift the Balance: Reza's Cheese Soup or Sausaquences and Peppers

Guess what today is! Guess what, guess what, guess what!

Okay, you're not going to guess so I'll tell you: TODAY IS THE DAY THAT DREAMFALL CHAPTERS: BOOK 5 COMES OUT!

No, but you guys, you have to understand, it's the final part of the final game of The Longest Journey saga, and it's been so long since Book 4 came out, and the ending of Book 4 kind of left me sobbing on my keyboard and I just...

I have a lot of feelings, okay?

Anyway, since we all know I celebrate with food, and since I already made Balance Cupcakes, I decided to make something out of the game itself.
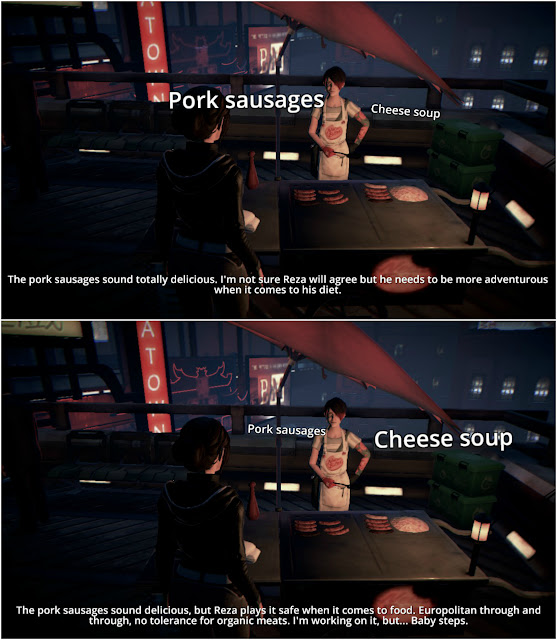
Pretty early on in Book 1 (it seems so long ago...), Zoe-- one of the main, playable characters-- has a simple fetch quest: pick up lunch for her boyfriend Reza, and bring it to his office. Seems simple enough, right? It's designed to help you get used to navigating the Propast area (which is totally my favorite in the game), so it's not trying to trip you up or anything. Go to the food cart, talk to the vendor, pick up a food item, find Reza. Easy peasy. Reza even gives you free reign to pick whatever you like, though Zoe knows he doesn't have the most adventurous palate.

However, this is a gritty technopunk future, so when Nela reveals that she has some very rare real pork sausages for sale, it's a bit of a game changer.
Zoe knows that Reza would prefer his usual order of cheese soup, but she also wants to broaden Reza's culinary horizons, and the pork sausages are hard to say no to. So, it's up to you as the player to make the choice.
It seems like an innocent enough choice, something simple for the devs to throw in to give the player the illusion of control. However, as the end card says when you finish Book 1, this choice actually has unexpected and far-reaching consequences. Or sausaquences, as Zoe refers to them in her journal.
And, after one dev tweeted about everything coming back to a choice to you didn't think mattered, everyone's pretty nervous about the sausaquences coming back to bite us.

In honor of that potentially fatal choice, I decided to make both foods so you can make the choice for yourself.
Since it's mid June and it's been pretty warm here in NJ, I decided to make both meals in the slow cooker. Not that Nela does that, but I didn't feel like standing over the hot stove or turning the oven on. Plus I don't have Karl to help out. (Karl is the name of Nela's food cart. It makes more sense in context).
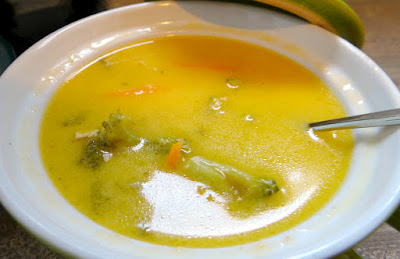
Reza's favorite cheese soup I decided to make nice and hearty. The broth is creamy and flavored with sharp cheddar cheese, and it's chock full of broccoli, potatoes, carrots, celery, and onions. Plus, to thicken it up a bit, since there's not much evaporation in the slow cooker, I added a couple tablespoons of instant potatoes. That's totally optional: you can add rice or noodles with will absorb some of the liquid, go for a cornstarch slurry, or leave it as is, but I liked it this way.

One note is that you really need to add the cheese at the end. Cheddar breaks very easily if it's cooked for too long. You can always use Velveeta to avoid that, but we all know real cheese tastes better.
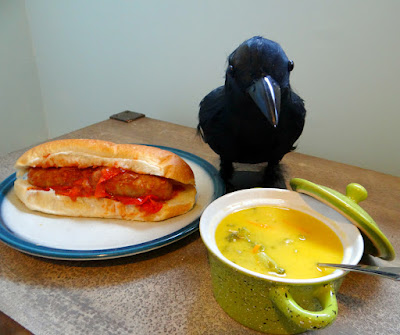
As for the sausages, since I wasn't going to make my own (Nela didn't either, so we're square), and plain sausages doesn't seem like much of a lunch, I went with sausage and peppers. Or, sausaquences and peppers, get it?
...
I thought it was funny.

Sausage and peppers is a ridiculously simple dish that I think every Italian knows how to make, and it's a fairly common street food around here, especially down the shore (usually served on a roll), so I thought Nela might approve.

My family usually makes it in the oven (dump everything in a baking dish, cover with foil, bake until the sausages are done), but now I might always make it in the slow cooker because holy crap on a cracker did it turn out good. The sausages were so tender they were like butter, and everything just came out so flavorful that I ate like three helpings when I went to taste it. Plus, it's even easier to make it in the slow cooker than the oven, since I don't have to preheat the oven or worry about a timer.

Now, you can brown the sausages on the stove first if you like. I won't stop you. Many people do, to cut down on grease and crisp up the casing. But that just seemed too much like work to me.
So now you have a very important choice to make: Reza's cheese soup or sausaquences and peppers. The fate of two worlds may be in the balance. Or possibly just the fate of your dinner.

Reza's Cheese Soup
Yield: 12 servings

Ingredients 
3 ribs of celery, chopped
2 potatoes, chopped
1 head of broccoli, chopped small
1 onion, diced
1 cup shredded carrots
6 cups low-sodium vegetable broth
1 tbsp. Worcestershire sauce
2 tsp. ground cumin
2 cans evaporated milk (I used skim)
3 tbsp. instant potato flakes (optional)
16 oz. shredded sharp cheddar
1/2 cup shredded Parmesan
Salt and pepper, to taste

Directions
In the bowl of a slow cooker, add the first eight ingredients. Cover and cook on low for 6-8 hours until the vegetables are soft and the potatoes are fork tender. Add the evaporated milk and potato flakes, stirring until the flakes have dissolved. Cover and cook 30 minutes, until heated through. Add the cheese, half cup at a time, stirring until completely melted. Season to taste with salt and pepper, and serve.

Recipe by Kim

Slow Cooker Sausage and Peppers
Yield: 6 servings 

Ingredients 
12 sweet Italian pork sausages
1 (28 oz.) can crushed tomatoes with basil
2 red bell peppers, sliced into strips
1 onion, sliced into strips
2 tsp. garlic powder
Salt and pepper, to taste
6 large rolls, to serve

Directions
Add the peppers and onion to the bowl of a slow cooker. Season with garlic powder, salt, and pepper. Add the sausages and crushed tomatoes. Give a quick stir to coat. Cover and cook on low for 6-8 hours, until the sausages are cooked through and tender. Serve in rolls.

Tip: if you have leftover sauce, add it to rice or pasta

Recipe by Kim 

May 11, 2016

Frozen Buttercream Transfer Tutorial


Okay, you guys know how I'm not a cake decorator, right? Like, you've been here through all of my rants about how the Cake Boss and similar shows have made people think baker = decorator when most decorators aren't actually great bakers. (I know a lot of cake decorators who use box mix because it's easier, quicker, and they can spend more time decorating. I'm not hating, I'm just saying that you don't have to be both) I know with me, I really don't have the patience for most cake decorating. Occasionally, I'll go a bit manic and decide that I can make royal icing transfers or dalek cupcakes, but even then, I'm aware of my limitations and try to keep things simple.

So when I tell you that that cake up there was super easy to decorate, you'd best believe me.
A frozen buttercream transfer is a cake decorating technique that works pretty much like it sounds. You create the design with buttercream and freeze it to transfer on to the cake. It's similar to the RI transfers I did for my Balance cupcakes, but unlike royal icing, the buttercream will only need 1-2 hours in the freezer to "set," and it won't harden. That means once you put it on the cake, you just need to let it defrost for about 15 minutes, and the buttercream is soft and creamy once more. People will think you're magic when they realize the design is delicious frosting and not edible paper.

Also unlike a RI transfer, if a frozen buttercream transfer cracks or breaks while moving it, it's no big deal. Let the buttercream soften for a minute and then press the cracked pieces back together, smoothing it out gently with your finger or a piece of waxed paper. Mine broke into three pieces when I moved it to the cake. Can you tell where it happened? Cause I sure can't.
Can't draw? No sweat. Coloring pages work perfectly with this technique. You can find all sorts of free coloring pages online (which is what I did), or you can get coloring books for cheap just about anywhere (and if you've got kidlets running around, you can just borrow one of theirs)
Source
This is the image I used, which I got for free on AZ Coloring. If you're just doing a character cake, you can just print it on out and get started. However, since a frozen buttercream transfer is an inverse technique, if you have any writing like I did, or if your image has to face a certain way, you have to flip the image. You can do this in any photo editor, or even in a Word document, which I did (the pan I used was roughly the same size as a piece of printer paper, so that was the quickest way to make sure the image took up most of the page).

If you're using a physical coloring book, you can scan the image in and flip it, or you can trace the image on tracing paper with a sharpie, then just flip the tracing paper over.
Tape your image onto a flat, portable surface (I used a cutting board), tape a piece of waxed paper on top of it, and start outlining. If your outline color is black, you're probably going to want to use a tube of black decorator's icing rather than homemade. True black is hard to get without massive amounts of food coloring and the premade black is less likely to bleed. Most people recommend using Wilton, but I didn't feel like going to Michaels just for a tube of frosting, so I used Cake Mate brand, which is carried in my local supermarket and has special tips you can screw right onto the tube. The tip was a little too big (the smallest they had was a #3), but otherwise it worked out fine.

Once your outline is finished, stick it in the freezer for about 15 minutes to set up. This is not strictly necessary, but it will help prevent bleeding and makes it easier when you fill in the rest of your colors.

While your outline is chilling, you can go ahead and mix up your buttercream. You don't want to use store bought frosting as you need the butter for it to freeze firm, so you'll want to use a recipe that's at least half butter (half shortening). If shortening skeeves you, I see no reason you can't use all butter, it will just need more time to thaw, and it won't take color as well.

I used 1 cup unsalted butter, 1 cup solid white vegetable shortening, 1 tsp. vanilla bean paste, a pinch of salt, and I didn't actually measure the sugar, but it was probably about 4 cups.
Once your outline is set and your buttercream is ready, you can start filling in your colors. I had planned out my colors before hand and I knew I would need a lot of white, so I just went in order of "colors that can be used to make other colors" (leftover pink was used to make purple, yellow made orange made brown). There's probably a better way to do it, but this worked for me. Make sure your buttercream is at room temperature, pipe it in (I didn't use a tip, but you can if you need more control)

Now, I specifically chose this design to cover the whole top of the cake, which is why I needed fill in all that white in the last picture. You don't have to do that. It depends on your design and your preference. I just like to do it this way. If your transfer is not going to take up the whole cake like mine, you'll just need to use your background color (in my case, white) to fill in any gaps (like the holes in the "hoot hoot"). Stick the transfer back in the freezer for another 15 minutes.

The last step, which I forgot to take pictures of, is a layer of more white (or whatever your background color is) over the entire transfer, making sure it's smooth and even. This makes sure you have an even base for the transfer. If you skip it, the frosting might sag once it thaws, and that doesn't look good.
Place it back in the freezer and freeze for a minimum of two hours. Once fully frozen, you can flip it onto your cake, or if you're making it ahead, like I did, wrap it up in a few layers of plastic wrap and keep it in the freezer until you need it. I made mine a week ahead, but as long as it's wrapped tight, I don't see why you couldn't keep it in there for 2 or 3 weeks.
Place it on the cake while still frozen, then let it thaw for about fifteen minutes. The transfer is thick, about half an inch thick, so piping a border around the edge helps it look a little more seamless. Of course, I'd never piped a shell border before in my life, so I'm not sure it actually did much to help. Once the buttercream is thawed, you can cut the cake as usual, and watch all your guests try to figure out how you did it.

May 4, 2016

R2D2 Brownie Bites

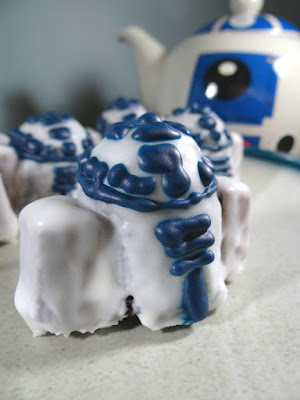
You may or may not remember back when I made the Dalek Cupcakes, I used a brownie pop pan to get the rounded top of the dalek's head. What you don't know, is that I didn't just buy the pan to make daleks. I remember thinking, looking at the pan, that it kind of looked like R2D2. I could just stick some mini kit-kats on the side for the legs, dip it in white chocolate, boom, it's R2.

And I was going to do just that. I even bought a bag of kit-kats to do it, and I never did. I ate the kit-kats and forgot all about it until now. I realized I had nothing planned for Star Wars day, and it hit me that I still had that brownie pop pan that looks like R2D2.
However, the original plans for edible R2 kind of got derailed. It's been raining for the past 3 days here in NJ, and as you can imagine, everything's rather damp. It's for this reason, I think, that my white chocolate refused to behave. Not to be deterred, I decided to use thinned royal icing instead, and while that did the trick (and I kind of prefer it, flavorwise), it wasn't without it's difficulties. It didn't want to stick to the kit-kats (you can still kind of see the chocolate in the picture) and I needed three coats of it to cover the brownies to my satisfaction. Royal icing also needs a lot more time to set set up, so it just took up a lot more time than I had planned for. Maybe I would have been better off with a liquid fondant or something else, but everything ended up working out in the end, so I can't really complain. Still, I recommend using candy melts instead of royal icing.
I was going to share a photo tutorial of how I made them, but there were kind of only three steps. 4 if you count baking the brownies, so it didn't feel necessary

Step 1: bake your brownies in the brownie pop pan. Use your favorite recipe. They only take 15-20 minutes to bake (the sweet spot for mine was 22 minutes, but every oven is different). Cool completely, then chill in the fridge to firm them up a bit. Level them off so they sit flat.

Step 2: attach the kit-kats. Take mini kit-kats, apply a little melted chocolate, and place them on either side of the brownie. Stick in the freezer for a few minutes to set.

Step 3: coat the brownies in melted white chocolate or thinned royal icing. Allow the excess to drip off and place on a waxed paper-covered plate to set. For chocolate, chill in the fridge for about 15 minutes. For royal icing, let dry at room temperature 1-4 hours until firm (may take multiple coats)

Step 4: decorate. I used blue royal icing to mimic R2's design. You can also use decorating icing, or candy melts, whatever you have on hand. I kept it pretty simple, but you can simplify it even more if you want, or go more realistic. R2's very recognizable, so you don't have to be exact.
Oh, I almost forgot about Step 5: nom.

Happy Star Wars Day! May the fourth be with you.

Other Star Wars treats:


March 16, 2016

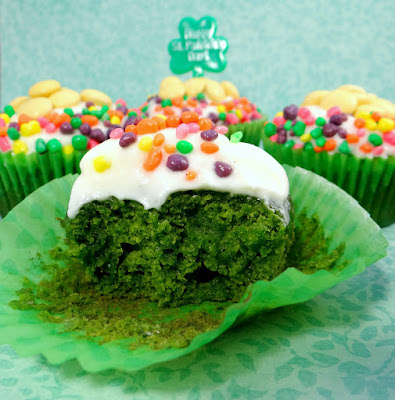
Naturally Green St. Patrick's Day Cupcakes


Having a sensitivity to food coloring confuses people sometimes, especially since mine is restricted to blue. What they don't seem to understand is that my body doesn't actually care if it looks blue, just if it contains the pigment Blue 1. You know what else contains Blue 1 besides blue food coloring? Green food coloring. Purple food coloring. A variety of foods that don't fall anywhere on the blue side of the color wheel, also known as my list of reasons I hate everything (because I usually discover these foods contain blue food coloring the hard way).

Reasons I Hate Everything List

  • Store bought marshmallows (even the gingerbread ones)
  • Cranberry ginger ale (ironically bought to make my stomach feel better)
  • Chocolate animal crackers
  • Peach Mango Crystal Lite
  • Reese's Pieces
  • Almost anything berry flavored
There's probably more, but since I've become obsessive about checking the ingredients on foods before I buy them, there's a lot less accidental blue food coloring ingestion, so I'm less angry about it. That's not to say I never slip up (sometimes on purpose, damn you sour gummy worms), but since my system has usually been cleaned out of all blue by that time, it's usually less "I hate everything" and more "well, that was not smart."

But when this time of year rolls around, and everyone decides to dye everything green, the subject starts to come up again. Well I tell someone I can't eat something that has green food coloring, they go, "Why, it's not blue," and I have to go back to the elementary school color wheel to explain how you make something green.
Enter the naturally green cupcakes. I originally made them last year for a friend who wanted "baby friendly" St. Patrick's Day cupcakes for her son's day care. I didn't know what baby friendly cupcakes meant, so I figured I'd just make something low sugar with no artificial ingredients and some hidden healthy stuff. (I topped those original cupcakes with an avocado cream cheese frosting, which made me sad because avocado+cream cheese tasted really good and all I wanted to do was add some garlic and onion to it and spread it on toast. Instead I, very reluctantly, had to add sugar)

I had low expectations for those cupcakes, as they were meant for tiny people who hadn't yet grown all of their teeth, but they were surprisingly tasty. I decided to try and make them again for Christmas, tweaking the recipe up a bit for adults, and topping them with some red velvet frosting. Those were really good, but I decided to make the full recipe in the blender, and the flour got overworked, so they came out a bit on the gummy side (which was also sad, because making them in the blender was so easy!)

So here we've come full circle and I decided to once again, this time with the tweaked recipe and without trying to make everything in the blender. Whattaya think?
Green enough for you? Except for the candy decorations, there is not a drop of food coloring in these bad boys. Have you guessed what makes that possible yet?

The answer is spinach. These cupcakes are loaded up with some green leafy goodness adding color and nutrition without tasting like it. While the cupcakes do have a different flavor than a straight up vanilla cupcake would, nobody can tell you made them with spinach unless you tell them. Plus, they're a lot healthier than a regular cupcake. You've got spinach, you've also got unsweetened applesauce, and there's only one stick of butter for the whole batch. It's practically health food. I've totally eaten these for breakfast and not felt one whit of guilt.

Of course, I've also eaten pie for breakfast and not felt guilty about it, so I may not be the best judge of food related guilt.

These cupcakes are a little more dense and a little more coarse than the ideal cake texture would be. You could skip the frosting and call them muffins, but then you don't get the moral superiority of eating spinach for dessert, and I'm not down with that.
As for the toppings, those are not healthy, but that's the part that makes them cupcakes.

The frosting is a cream cheese frosting, and it wasn't half bad, considering I'm not a huge fan of cream cheese frosting, but it refused to stiffen. I have never made a cream cheese frosting that stiffened properly. I don't know if it's because I purposefully use less powdered sugar than most recipes (most cream cheese frosting recipes are way too sweet.Tooth-achingly so. I don't think I will ever understand), but it never happens for me.

Decorations wise, I went super simple. I separated out the yellow M&Ms from a bag of spring colored ones (spring yellow is paler, but there's more per bag), and placed them on top to look like gold coins. Then I sprinkled some rainbow-colored Nerds around the edges to represent a rainbow. You could totally use rainbow sprinkles instead; that was actually my plan, but I saw the rainbow Nerds in the grocery store and I got excited. XD

I realized afterwards that using neon-colored candies to decorate my naturally colored cupcakes was a bit contradictory, but they're pretty so I don't care. (I actually didn't end up eating any of the decorated ones, so it all worked out in the end)
Spinach Cupcakes
Yield: 18

Ingredients
5 cups packed fresh spinach
1 cup maple syrup
1/2 cup unsweetened applesauce
1 tbsp. apple cider vinegar
1/2 cup unsalted butter, softened
1/2 cup granulated sugar*
2 eggs
1 tbsp. vanilla extract
2 cups all purpose flour
1 tsp. baking soda
1/2 tsp salt
Cream cheese frosting

Directions
Preheat the oven to 350 degrees F.

Add the spinach, maple syrup, applesauce, and vinegar to a blender and blend until completely smooth.

In the bowl of a stand mixer, beat the butter and sugar together on medium speed for about 5 minutes, or until fluffy. Add the eggs, one at a time, until well incorporated. Add the vanilla.

In a mixing bowl, combine the flour, baking soda, and salt. Add about half the flour mixture to the butter, beating on low until just combined. Add half the spinach mixture and continue to mix, scraping down the sides of the bowl as necessary. Add the remaining flour and spinach mix, and beat on low speed until well combined.

Line a muffin tin with paper liners and fill three quarters of the way with batter. Bake 18-20 minutes until a toothpick inserted in the middle comes out clean. Cool completely on wire racks before frosting.

*I have skipped the sugar before with no ill results, besides being not quite sweet enough, so if you prefer to not use refined sugar, you can leave it out.

Recipe by Kim

February 26, 2016

The Longest Journey Balance Cupcakes

Hot Chocolate and Chai Tea Cupcakes with Chai Spiced Buttercream

Do you guys know what my favorite video game of all time is? Probably not, because I've never talked about it on the blog (although I have talked about one of its sequels), and I don't think you're psychic. I'm not even sure that you'd be able to guess, as it's pretty old now and a bit on the obscure side.

That game is The Longest Journey. It's one of those old point and click adventure games that used to be all the rage in the 90s where gameplay was focused on puzzle solving rather than killing all the things. In fact, The Longest Journey is best known for one of it's puzzles. All you have to do is mention "the rubber ducky puzzle" and anyone who has played the game will know exactly what you're talking about.
Source
Don't let its cute and innocent appearance fool you. It's an instrument of pure evil

The rubber ducky puzzle is famous for being really ridiculously difficult. I honestly don't know how anyone could solve it without help. It never occurred to me that I had to feed bread to the seagull and fix the water pressure machine in order to open the electrical box across town so I could sneak into the movie theater. (I skipped like 25 steps in that description. I didn't want to spoil all the fun).

Rubber duckies notwithstanding, The Longest Journey amazed me with the most fantastic storytelling, world-building, and character development I've ever seen in a video game. If you don't mind dialogue heavy games (and there is a lot of dialogue) I highly recommend it. Don't let the dated character animations put you off a spectacularly enjoyable game.

Anyway, with the newest installment of The Longest Journey saga, Dreamfall Chapters, almost complete (I don't want it to end, but I also WANT MAH BOOK 5 NOW PLS), I really wanted to make some cupcakes inspired by the franchise. I did consider making rubber ducky cupcakes, but they'd have to be blue and with my food coloring sensitivity, I wasn't about to let the rubber ducky make me sick. He's caused me enough suffering.
The Balance between the parallel worlds of Stark (the world of science. AKA us) and Arcadia (the world of magic. AKA I want to go to there), however, is a consistent theme throughout all three games, and is the driving force behind the events of The Longest Journey (and is in peril again with the dream conspiracy in Dreamfall Chapters), so the Symbol of the Balance is an immediately recognizable representation of the game. When I found some chocolate cookie icing on clearance at the grocery store, I figured I could use that to make some royal icing transfers to decorate with.

Source
Now, I've worked with royal icing twice in my life (and once was just to draw a smiley face on Sherlock Cupcakes), and I've never made royal icing transfers before. However, I have read a lot of cookie decorating blogs (at one point in my life I decided I was going to start decorating cookies. Then I remembered how much I hate roll out dough. But they're still fun to look at), so I figured I knew enough to swing it. And actually, it wasn't that hard. Time consuming? Most definitely. But once it's dry, a royal icing transfer will keep for ages in an airtight container, so it's great for making ahead. The symbol of the balance actually lent itself well to royal icing, as it's mostly made up of fluid lines and not sharp edges. I did have to coax it into place a few times with a toothpick, but from all the cookie decorating blogs I've read, that seems normal.

All you need to do is print out the image you want (in my case, the symbol of the balance), tape it to a cookie sheet or similar flat surface, tape some waxed paper over top. Take your cookie icing in your "outline color" (I used Betty Crocker brand chocolate flavored) and follow the pattern. Let dry for a few hours.

Then I mixed up a small batch of flood consistency white royal icing (I just halved the recipe that comes with the Wilton meringue powder) and fill in all the empty spaces (use a toothpick to get the corners). I ended up doing a reverse image type deal because that was just easier, but either way works. (And if you don't know what "flood consistency" means, check out this post from LilaLoa. I'd try to explain it, but I'd probably just confuse you). Let dry at minimum over night. They take a very long time to dry, and if you try to remove them from the wax paper before they are, they'll be unsalvageable.
Then very carefully and gently remove them from the wax paper. These were thick enough that I had no trouble removing them, but I've seen people remove royal icing transfers using a knife and a sharp corner, so if you're making a delicate design, please refer to someone who actually knows what they're doing.

The Betty Crocker icing worked great (especially since I don't own tiny decorating icing tips, so using the pouch was easier for me) but it did bleed a little into the white. The bleeding itself wasn't that noticeable, but you can seen see in the photos that it makes it look like the chocolate has bloomed, which is not a thing you normally want chocolate to do.
The air bubbles are totally on me, though
There was no food coloring in the icing (I checked the ingredient list), so I didn't expect there to be any bleeding. I'm not sure if I just didn't let it dry long enough before flooding with the white, if it's just a problem with the prepackaged recipe, or if this is the reason it was on clearance. I can't actually seem to find anything about using Betty Crocker cookie icing to make a royal icing transfer, so it might just be that it was never intended for stuff like this and I should have realized that.

So in conclusion: Royal icing transfers are a surprisingly easy, though time consuming, way to make decorations, and you probably shouldn't use the cookie icing you bought on clearance to make them. Moving on...
Cupcakes! It took me a while to figure out exactly what kind of cupcake to make for these, because I wanted something that could represent the Balance flavor wise. I also wanted there to be a visual distinction between the two flavors. I considered doing just vanilla and chocolate, but I wanted it to be two flavors that wouldn't necessarily seem like they went together, so it would be a balanced flavor. Get it?

I also briefly considered making them yam flavored, because that would make Kian happy, but I ultimately decided against it. Mostly because I don't actually like yams.
Source
Kian will never forgive me

I'm not completely sure how I ultimately ended up with chai tea and hot chocolate. It might have had something to do with the fact that it was about 10 degrees out when I made them. (It's 50 degrees out right now. WTF, nature? Pull yourself together) But when you think about it, tea has a reputation of being very cultured and refined, so it could stand for logic (Stark). Hot chocolate is sweet and frivolous, and therefore could stand for chaos (Arcadia). Plus, they're both related, in that they're both hot beverages that you want to drink when it's 10 degrees out and probably add milk to.

Boom. Nailed it.
The cupcake will remember this
So technically, the whole cupcake is tea flavored, because it was easier to steep the tea in the milk than to figure out how to add it after I halved the batter. I started with my very favorite vanilla cupcake recipe, added the tea, and divided the batter in half. To one half, I added a packet of dark hot chocolate mix, and to the other, I added a chai spice mix of cinnamon, cardamom, ginger, allspice, and cloves. The flavors meld together well, but are still distinctive enough that you can taste the difference between the two halves. And what bridges the two halves? Storytime, of course.
Storytime is definitely the prettiest location in Dreamfall Chapers. Although Propast is still my favorite
Just kidding. I wouldn't know how to add a Storytime element to the cupcakes. Gooey dream-filled center? (Because Storytime is the world of dreams and dreams flow between the two worlds bridging the divide.)

Maybe the frosting? But no, the frosting is kind of more like the House of all Worlds. It touches both halves, it's part of the cupcake, but it's still separate from the actual cake part.

Whoa, this is getting deep.

The frosting is just my basic buttercream with some chai spices. I would have loved to do some whipped cream on top of these cupcakes, but I needed something sturdy for the RI transfers, so I went with my old standby. And it's still delicious.
So the moral of the story is that awesome video games deserve awesome cupcakes. And if you're not playing Dreamfall Chapters, you should go do that immediately. Or play The Longest Journey. Or Dreamfall: The Longest Journey (which is the middle game of the series and my least favorite. But still great, storywise). Because if you haven't played any of them, then you haven't earned these awesome cupcakes. Also, it means that you've never met Crow, who is basically just the best ever, and I feel sorry for you.

I kind of want to feed Crow all the cupcakes.
ILU Crow
Hot Chocolate and Chai Tea Cupcakes
Yield: 24 cupcakes

Ingredients
For the Chai Spice Mix:
2 tsp. cinnamon
1 1/2 tsp. ginger
1/2 tsp. cardamom
1/2 tsp. cloves
1/2 tsp. allspice

For the cupcakes:
2/3 cup milk
3 black tea bags
2 1/2 cups cake flour
2 tsp. baking powder
1/2 tsp. baking soda
1/2 tsp. salt
1 1/4 cup sugar
1 cup unsalted butter, softened
3 eggs
8 oz. sour cream

1 tsp. vanilla extract
1 packet dark hot chocolate
1 tbsp.  Chai Spice mix

For the frosting:
1/2 cup (1 stick) unsalted butter, softened
1/2 cup solid white vegetable shortening (Crisco)
3 1/2 cups powdered sugar
2 tbsp. milk
Remaining Chai Spice Mix (2 tsp.)
1/2 tsp. vanilla extract
Pinch salt

Directions
In a small bowl, mix together the Chai Spice Mix ingredients. Set aside. In a small saucepan over low heat, bring the milk to a simmer. Add the tea bags and remove from heat. Allow to steep until the milk has cooled to room temperature. Remove and discard the tea bags.

Preheat the oven to 350 degrees F. Line 2 muffin tins with 24 cupcake liners. In a medium mixing bowl, mix together flour, baking powder, baking soda, and sale. Set aside. In the bowl of a stand mixer, or in a large mixing bowl with electric beaters, beat the butter and sugar together at medium speed until fluffy. Add the eggs, beating well after each addition. Add the vanilla and sour cream, and mix until fully combined. Mix in the milk and then the other half of the flour mixture. Beat until smooth, scraping down the sides of the bowl as necessary.

Divide the batter equally between two bowls. In one bowl, stir in the packet of hot chocolate mix. In the other bowl, stir in 1 tbsp. of chai spice mix. Divide each batter equally between the 24 baking cups. Bake 15-17 minutes, until an inserted toothpick comes our clean. Cool completely on wire racks.

For the frosting: With an electric mixer, beat the butter and shortening on medium speed until smooth. Reduce the speed to low and gradually add the powdered sugar. Add the milk, vanilla, and chai spice mix and gradually increase speed to high. Whip on high until smooth and fluffy.

Recipe by Kim
These cupcakes are an essential part of a well Balanced diet.
...

Crow would have appreciated that joke.